Wednesday, May 5, 2021

Tiny Just Mason Around from The Greetery

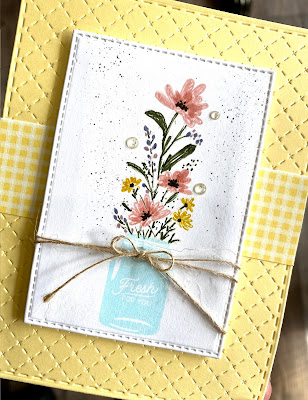
I got my order from The Greetery and Betsy had included a little freebie in honor of her 2nd anniversary. It is a very cute, but tiny, stamp of a her Mason jar set and a bouquet of flowers. My daughter hasn't received her order yet so I got to work and made a quick card to show her.

It is a 2 piece set so the jar was easy to stamp. The flowers were a bit more challenging.  I tried a couple different things but ended up stamping the bouquet in Soft Stone and then using the fine tip end of markers to go over it and color in the parts of the bouquet. It is a bit messy because I did it fast but I do like the results.


After doing the flowers I flicked some Early Espresso around the bouquet, added some clear Nuvo drops and tied some twine around in a bow.


I think that next time I might try die cutting some mini flowers to add to the jar. I'm thinking my new Alphabuds Bold might do the trick :-)

SUPPLIES:

Stamps: Tiny Just Mason Around (free thank you set from The Greetery)

Paper: White, Lemon Tart, Lemon Tart Pattern Pack (pti)

Ink: Soft Stone, Aqua Mist (pti)

Dies: Border Basics: Rectangle, Border Bling: Tin Stitched (itp); Stitched Rectangles Stax die-namicss (mft)

Other: SU markers (Always Artichoke, Early Espresso, Crushed Curry, Wisteria Wonder, Pale Plum, Blushing Bride); Linen thread (May Arts), spritzer, Clear Nuvo Crystal Drops


Friday, November 13, 2020

Noel Stag

Working on my Christmas cards. I knew that there was a stag challenge out there and I was going to enter this until I realized it was a CAS + stag challenge. This wasn't really hard but there are a lot of layers so I guess I will have to make another go at it. 


Thanks for stopping by and hope to see you soon with a CAS stag card :-)


SUPPLIES

Paper: White, Kraft, Handsome Hunter, Vintage Cream, Wrapped in Plaid dsp (SU)

Dies: Nordic Frames (mft); Noel Word (Lil Inker Designs)

Other: Tasteful Textile embossing folder (SU)


Monday, October 5, 2020

Hello Lovely

 I just got this Hello Lovely set from Concord & 9th. I combined it with Stacked Decorative Edges dies from Spellbinders to create this card.

I masked off the die cut area and stamped the flowers. The images are a very loose style and you can't really go wrong no matter how you stamp them. I think that next time I will stamp & die cut the flowers and then overlay them over the decorative border but I like this version for my first card with this set. 


Have a great day!


SUPPLIES:

Stamps: Hello Lovely (Concord & 9th)

Paper: White, Summer Sunrise (pti)

Ink: Black, Harvest Gold, Summer Sunrise, Orange Zest, Melon Berry, Spring Moss, Olive Twist

Dies: Stacked Decorative Edges - Small dies of the month May 2020 (Spellbinders)


Monday, September 28, 2020

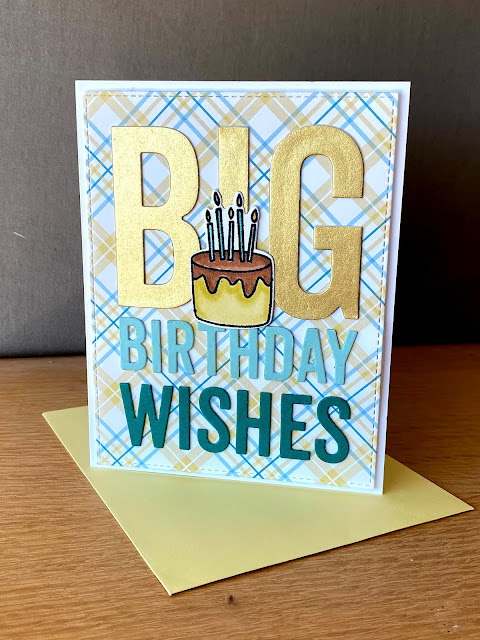
Quick Birthday Card

 I needed a fast birthday card so I cased this cute card for my brother's birthday.  I didn't have the cupcake stamp set so I used Birthdays Take the Cake instead.


I die cut the words from each of the colored papers and also one time from white. I backed the colored letters in white for a tiny bit of elevation and then used the negative space in the white sheet to place the words on the pattern paper. I colored the cake with the alcohol markers.


You can see the shine in the gold letters better in this photo.


This card came together really quickly since the sentiment is all one die. 


SUPPLIES:


Stamps: Birthdays Take the Cake (mft)

Paper: White, Aqua Mist, Tropical Teal (pti), gold (not sure what this is), Party Plaid Paper Pad  (mft)

Dies: Big Birthday Wishes Die-namics, Birthdays Take the Cake (mft)

Other: Spectrum Noir Tri-Blend markers


Saturday, September 26, 2020

Piece of Cake For a Friend

Here is a birthday card I made for a friend at church.

I just got some Tim Holtz distress oxide glazes and I wanted to try them out. I die cut the cake and then tapped Versamark all over. Then I sprinkled Fossilized Amber glaze all over and heat set it. So the cake is really shiny but you can't see that in the picture.

I ink blended some Antique Linen distress oxide ink all around the perimeter of the circle and the cake is popped up on foam tape. I used 2 colors of yellow Zig markers to color the flame on the candle.


Thanks for stopping by to look at my card :-)


SUPPLIES:

Stamps: Birthday Greetings (mft)

Paper: White, pink (pti), Petite Gingham paper pad, Positively Preppy paper pad (mft)

Ink: Black, Antique Linen Distress Oxide, Veramark

Dies: Piece of Cake die-namics, Inside & Out Stitched Circles (mft); Scallop Stackers: Large (pti)

Other: Fossilized Amber Distress Oxide Glaze (Tim Holtz), Blending brush, foam tape, Zig markers


Saturday, September 19, 2020

1st Christmas Card Down

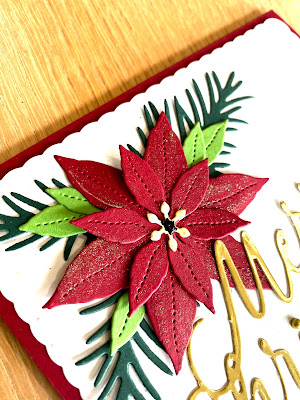
 I've been wanting a poinsettia die for a long time and when Concord & 9th just released their version I decided that was the one. It arrived in the mail today and I had to play. So here is my first Christmas card.


It's hard to see in the picture but there is Wink of Stella on the poinsettia leaves which give them a bit of sparkle.


The poinsettias come together quickly and look prettier in real life than my pictures show. Thanks for stopping by.

SUPPLIES:

Paper: Cherry Cobbler, Handsome Hunter, Confetti White (SU); New Leaf, Lemon Tart, Luxe Gold (pti)

Dies: Fresh Cut Florals Edition 4 (C9); Big Basics: Merry Christmas, Scallop Stackers: Small (pti)

Other: Bright Gold, Ebony Black (Nuvo Crystal drops), Clear Wink of Stella


Friday, September 18, 2020

Happy Anniversary to my Brother & SIL

 Hi! It's been eons since I have posted anything. It's been a crazy year but I guess you all know that plus my daughter moved states for a new job and I helped her with that.

Here is a card that I made for my brother & sister-in-law's anniversary.


I ink blended the background and then spritzed with water. I cut that panel down to 3-1/4″ x 4-1/2″ and then taped it directly to the card base.  For the sentiment I pieced together two sentiment stamps which I really hate doing. I never get them lined up properly. I popped up the cacti on foam tape and then added the clear Nuvo drops. I like how the color shows through after they are dry. I definitely need to practice on those drops though. Some are pretty lopsided.

Hopefully it won't be another 9 months before my next card :-) Thanks for looking!!

Supplies:

Stamps: A Second Helping of Sunshine (pti)

Paper: White, Tropical Teal, New Leaf, Green Parakeet, Hibiscus Burst, Raspberry Fizz, Canyon Clay (pti)

Dies: To The Point (Concord & 9th)

Ink: Versafine Onyx Black; Distress Oxides (Wilted Violet, Picked Raspberry, Carved Pumpkin)

Other: Morning Dew (Nuvo Crystal Drops); black marker to do the exclamation point, foam tape, blending brushes


Wednesday, January 29, 2020

Happy Anniversary

Some friends at church are celebrating their anniversary on 2/2. I guess that would be an easy date to remember :-)  I made them this card.


I have been playing with different Concord & 9th turnabout sets.  This is their wreath turnabout and it can give so many looks. Since their anniversary is close to Valentine's Day I went with the pink colors.


I added a strip of vellum in the middle to soften the look and hold the sentiment. I looked at both plain vellum and the polka dot vellum and ended up picking the polka dot. It just seemed to add something extra. 

I used my Glimmer machine for the sentiment. I just can't get enough of glimmering :-)  I also added some pretty pink metallic paper at both the top and the bottom. I thought it would go with the the sentiment.


Well I hope that you liked my anniversary card. Thanks for stopping by!

SUPPLIES:
Stamps: Wreath Turnabout (Concord & 9th)
Paper: White (pti); Metallic Confections paper (Tim Holtz)
Ink: Soft Stone (pti), Pretty in Pink, Regal Rose, Melon Mambo (SU)
Dies: Elegant Occasions Sentiments (Spellbinders)
Other: Patterned vellum (pti)
Hot Foil Plates: Elegant Occasions Sentiments (Spellbinders) 
Hot Foil: Pink  (Spellbinders)


Friday, January 24, 2020

Glimmering Birthday Butterfly

It's been a while and now that the holidays are over I have a bit more time in my craft room. I have new goodies to play with and Glimmer hot plates are some of them. My aunt is turning 92 on Feb 1st and this card will go to her. I used a card from the Spellbinders blog as a guide for my card.


It's hard to catch the pretty shimmer with a camera but I hope that you can see it in the next couple of photos.

I thought it would be pretty to use linen paper but it turns out it is hard to foil on linen. I had to rerun it through several time but fortunately I had taped the hot plate down so that I could do it over. Lesson learned... don't use linen paper for foiling.


 Here is a close up where you get a better look at the pretty blue of the butterfly.


I really had fun making this card and like how it turned out. Thanks for stopping by.

Supplies:

Stamps: None
Paper: White linen, white, Luxe Silver Adhesive paper (pti); Watercolor Wash dsp (mft)
Ink: None
Dies: Butterfly die that came with the Glimmering Butterflies hot plate (Spellbinders)
Other: 1/8" foam tape under butterfly
Glimmer Plates:  Glimmering Butterflies; Art Deco Borders; Birthday Hugs & Wishes (Spellbinders)
Hot Foil: Pewter, Skybright  (Spellbinders)

Friday, August 30, 2019

Anniversary card for my brother and SIL

Hi!  I have a few new goodies and some time to stamp. My brother's anniversary is coming up. I wanted a card not too flowery and thought this worked pretty well.


I love plaid and I just got a stamp by Concord & 9th called Sketched Stripes Background. I stamped the stripes once in each direction in Weathervane and then again in Tattered Rose DOX.

I played with various combos of ink for the sentiment and ended up with Smokey Shadow, Melon Berry and Weathervane. It gets your attention and the shading is not too in your face.

I like the shape of the Elegant Rectangle Stax dies but really had hoped that there would be less space between the dies. I guess next time I will trim down the outer layer.

At this point something was missing and I played for a long time before realizing that a simple polka dot strip would do the trick.

I think this would be great for a masculine card for any occasion. My SIL's birthday is coming up soon so I will give her a more feminine card then :-)

Thanks for stopping by and checking out my card!


Supplies:
Stamps: Shadowed Sentiments (pti); Sketched Stripes Background (Concord & 9th)
Paper: White, Weathervane, Melon Berry Pattern Pack (pti)
Ink: Smokey Shadow, Weathervane, Melon Berry (pti); Tattered Rose (Ranger Distress Oxide)
Dies: Elegant Rectangle STAX Die-namics (mft)


Related Posts Plugin for WordPress, Blogger...