Showing posts with label Christmas. Show all posts

Friday, December 2, 2022

Rustic Wood Star

 I just got the new Papertrey Ink "Rustic Wood Star" dies and I love their country look. I fell in love with them after seeing Kelly Lunceford's beautiful card. 


Here are the Distress Oxide inks that I used:

Star: Antique Linen, Brushed Corduroy, Gathered Twigs, Vintage Photo

Wreath: Frayed Burlap, Ground Espresso, Vintage Photo

Brick: Ground Espresso brush over some of the bricks

Leaves: Rustic Wilderness, Mowed Lawn 


OTHER SUPPLIES:

Paper: White, black, Kraft, Cherry Cobbler, Handsome Hunter (SU), Autumn Chicken Scratch Gingham (pti)

Ink: DOX - see below

Dies: Rustic Wood Star, Nesting Basic: Ovals, Nesting:Pierced Ovals (pti); Perfect Sentiments: Holiday (Pinkfresh Studio)

Other: Brick & Mortar 3D embossing folder, Pinewood Plank 3D embossing folder (SU); white ink for splatters

Hot foil plate: Perfect Sentiments: Holiday  (Pinkfresh Studio)

Hot Foil: Red (Spellbinders)


Tuesday, October 18, 2022

Jumbo Curiosity Round Ornament

 I got two new items in the mail on the same day and had to put them together. The Jumbo Curiosity Round Ornament die by The Greetery and the Scattered Christmas embossing folder by Spellbinders. I based my card on this one by Laurie Willison.

It's hard to see in the photo but I cut the branch with Close to Cocoa and shaded it with Early Expresso. The pine needles are cut from Soft Succulent and shaded with Handsome Hunter.


I used the Opposites Attract Holiday Hot Foil plate by The Greetery for the sentiment. You can see the shine below.


SUPPLIES:

Paper: White, Handsome Hunter, Close to Cocoa, Soft Succulent (SU), gold foil, kraft (pti)

Ink: Early Espresso, Handsome Hunter (SU)

Dies: BotaniCuts Pine Bough, Jumbo Curiosity Round Ornament (The Greetery)

Other: Red Rhinestone Basic Jewels, Sage Shadow Stampin’Write marker (SU), red twine (American Crafts), Scattered Christmas embossing folder (Spellbinders), foam tape

Hot Foil Plate: Opposites Attract Holdiday (The Greetery)

Hot foil: Matte gold (Spellbinders)


Friday, September 16, 2022

Seasonal Swirls Christmas Wreath

 I'm getting started on my Christmas cards.


The wreath on this card was inspired by Mary Deatherage.

• Die cut 1 wreath from Pear Pizzazz and 1 from each of the colors in Eden’s Garden Cotton Paper (Evening Evergreen and Soft Succulent)


• Die cut 1 wreath with stars from the silver foil


• Evening Evergreen 5-1/4 x 4"


• Gingham Cottage dsp: 4 x 2-3/4”


• Sentiment strip Smoky Slate: 3-1/4 x 1/2”

• Evening Evergreen: 3-3/8 x 5/8”


• Foam tape under dsp & sentiment


• The embossing folder must be run through twice to cover the entire Evening Evergreen piece


SUPPLIES:

Stamps: Sparkle of the Season (SU)

Paper: Evening Evergreen, Smoky Slate, Pear Pizzazz, Gingham Cottage dsp, Ever Eden Cotton Paper (SU), silver foil

Ink: Evening Evergreen (SU)

Dies: Seasonal Swirls (SU)

Other: Wintery 3D embossing folder, silver cord (SU), foam tape


Saturday, December 11, 2021

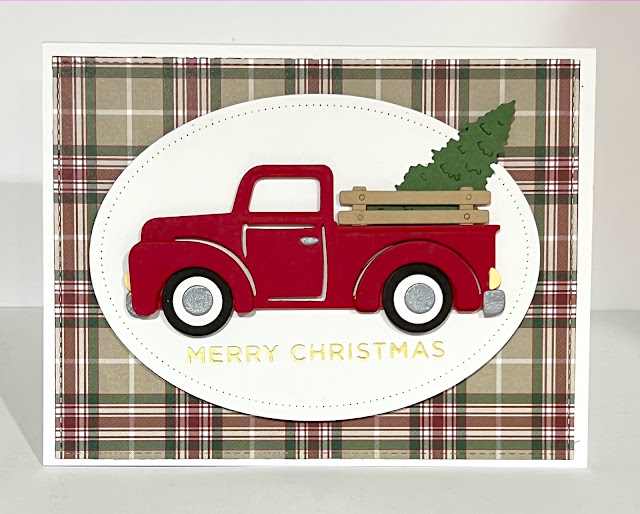
Red Truck Christmas

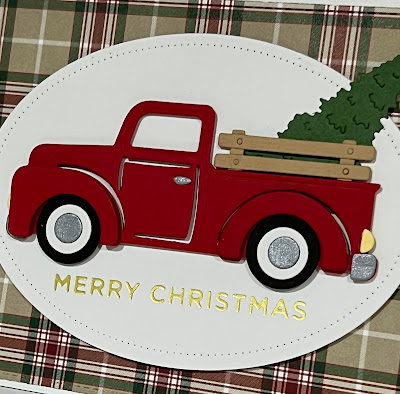
 I love this little truck. It's one of those things when you see it you know you "need" it. It's called Holiday Haul by Spellbinders.  It has lots of tiny bits that are kinda fiddly but I love how this card turned out. It's late afternoon and raining outside so sorry that the photo is a bit darker than the actual card.


Everything is straight forward. The oval is popped up on foam tape. The truck's fenders are popped up and the whole truck is popped up on the oval.

The sentiment is hot foiled with matte gold foil.


Here are the supplies that I used:

Paper: Real Red, Basic Black, Garden Green, Creamy Caramel-ret., Plaid Tidings 6x6 dsp-ret. (SU); brushed silver, Lemon Tart (pti)

Dies: Holiday Haul (Spellbinders); Stitched Rectangles (mft); Nesting Basics: Ovals, Nesting Basics: Pierced Ovals (pti)

Hot Foil Plate: Holiday Sentiments Series 2 (Spellbinders)

Hot Foil: Matte gold (Spellbinders)

Other: foam tape


Saturday, September 25, 2021

Using Up Leftovers

 I had some pieces leftover on my table from 2 other cards and so I started playing them and put together this card.

My starting pieces were the tree and the 2 dsp pieces. I added a 4 x 5-1/4" piece of Handsome Hunter which I embossed with Tasteful Textile embossing folder. I also embossed the smaller of the 2 pieces of dsp which is directly behind the tree. 


The hardest part was the sentiment. I didn't want to cover up the tree too much and I didn't have a die that I felt worked so I took a stitched rectangle die the correct width and cut out a piece of white cardstock. Then I flipped the piece 180 degrees and carefully matched up the sides and cut it again to a size that fit the sentiment vertically. It took me 4 tries before I liked the result :-). I also added Wink of Stella to the snow on the branches but I guess I did that after taking the picture. It sparkles it up.


Thanks for stopping by!

SUPPLIES:

Stamps: Christmas to Remember (SU)

Paper: White, Handsome Hunter-ret, 2021-2023 In Color dsp, Tidings of Christmas dsp (SU)

Ink: Evening Evergreen (SU)

Dies: Woodlands (Tim Holtz-Sizzix), Stitched Rectangles (mft)

Other: Tasteful Textile 3D embossing folder, Dimensionals, Liquid Applique (Marvy), Wink of Stella on top of the applique, Wink of Stella


Wednesday, September 22, 2021

Mystery Stamping with Jaimie

 I am so far behind in posting my cards but here is one that I made yesterday with my SU upline & team. She called it Mystery Stamping. We were given the basic supplies & paper dimensions that we needed but she did not tell us the final sketch/layout of the card. It was fun to see what everyone came up in the end. Here is my card.


It's a pretty straight forward card.  I recently bought some liquid appliqué and I wanted to try it out so I added it to the tree branches to look like snow.  It's interesting stuff. You apply it, let it dry & then heat it with a heat tool. When it gets hot it puffs up. Very fun!


Dimensions of cardstock pieces:

White: 3-5/8 x 4-5/8”

Cherry Cobbler: 2-1/2 x 4-1/2”

dsp: 1 x 4-1/2”


Thanks for stopping by!


Here are the supplies that I used:

Stamps: Christmas to Remember (SU)
Paper: White, Kraft (pti),  Handsome Hunter-ret, Cherry Cobbler, Tidings of Christmas dsp (SU)
Ink: Evening Evergreen (SU)
Die: Woodlands (Tim Holtz Sizzix), Seasonal Labels (SU)
Other: Wintry 3D embossing folder, Holiday Rhinestone Basic Jewels, Rhinestone Basic Jewels (SU), Liquid Applique (Marvy), Foam Tape, heat tool


Friday, November 13, 2020

Noel Stag

Working on my Christmas cards. I knew that there was a stag challenge out there and I was going to enter this until I realized it was a CAS + stag challenge. This wasn't really hard but there are a lot of layers so I guess I will have to make another go at it. 


Thanks for stopping by and hope to see you soon with a CAS stag card :-)


SUPPLIES

Paper: White, Kraft, Handsome Hunter, Vintage Cream, Wrapped in Plaid dsp (SU)

Dies: Nordic Frames (mft); Noel Word (Lil Inker Designs)

Other: Tasteful Textile embossing folder (SU)


Saturday, September 19, 2020

1st Christmas Card Down

 I've been wanting a poinsettia die for a long time and when Concord & 9th just released their version I decided that was the one. It arrived in the mail today and I had to play. So here is my first Christmas card.


It's hard to see in the picture but there is Wink of Stella on the poinsettia leaves which give them a bit of sparkle.


The poinsettias come together quickly and look prettier in real life than my pictures show. Thanks for stopping by.

SUPPLIES:

Paper: Cherry Cobbler, Handsome Hunter, Confetti White (SU); New Leaf, Lemon Tart, Luxe Gold (pti)

Dies: Fresh Cut Florals Edition 4 (C9); Big Basics: Merry Christmas, Scallop Stackers: Small (pti)

Other: Bright Gold, Ebony Black (Nuvo Crystal drops), Clear Wink of Stella


Saturday, December 5, 2015

No Stamp Christmas Card

I am way behind on my Christmas cards this year. This one came together pretty quickly because there is no stamping on it. The hardest part was picking the little pieces out of the sentiment after die cutting :-)


Merry Christmas is cut out of some red glitter paper that I got from SU years ago. I think it makes the sentiment a pretty, sparkly focus. Finally, I popped up the holly on dimensionals.


That's it. Pretty easy.  Have a great Saturday!!


SUPPLIES:
Stamps: None
Paper: White, Holiday Plaid DSP (PTI), Handsome Hunter, Real Red, Red Glitter paper (SU)
Ink: None
Other: Wet Paint Holiday dies, Holly Jolly die, In the Meadow die collection (PTI)

Wednesday, December 2, 2015

Final Card Concept Challenge of 2015

Wow! Christmas will soon be here.  Today we have the last Card Concept Challenge of 2015. The inspiration photo is a color combo but you can also be inspired by the snowflakes if you like.


I chose to go with both the colors and the snowflakes for my Clean & Simple card.  I die cut 2 snowflakes and layered them then added a piece of twine. Next I cut a a piece of vanilla using a Fishtail Flag die then ran it through my Big Shot again and cut the opposite end to get a double ended tag for my sentiment.


The base cardstock of Night of Navy looked a bit spare so I spritzed Glimmer Mist on to give it some sparkle. This looks cool (though hard to photograph) but it also warped my cardstock. I guess I'll be pressing the card under a book :-)  Another thing which you can't really see in the photo is that I added Wink of Stella to the snowflakes so they also shimmer. Very pretty IRL!


I hope that you will visit the rest of the design team to see what they came up with. I'm looking forward to seeing all your creations!

Merry Christmas! See you in January!


SUPPLIES:
Stamps: Keep It Simple: Christmas (PTI)
Paper: Night of Navy, Very Vanilla (SU)
Ink: Enchanted Evening (PTI)
Other: Eliza and Kate snowflake dies (SSS), Fishtail Flag Stax die (MFT), Wink of Stella Glitter pen clear, Glimmer Mist (Tattered Angels), twine

Wednesday, November 18, 2015

Card Concept Challenge #44

Hi everyone! We are moving into the holiday season with our inspiration photo for this challenge. Can't you just smell the cinnamon sticks and hot apple cider on the stove.


For my card I wanted to try a new (to me) technique using foil on the card.  I got some Sticky Embossing Powder, Versamark & foil and tried several times to get this technique to work and failed each time. Finally I resorted to using good ole gold embossing powder on the star. I think that since I was trying to emboss on white card stock I must have heat it too long. Have any of you had luck using Sticky Embossing Powder with your stamps? I'd love to hear about it.


My card is Clean & Simple. You can read about the styles here. The tree is stamped on a white tag.  I really liked the plaid chair in the photo and so I cut a second tag from a piece of plaid paper and placed it behind the tree. This is popped up on dimensionals. Finally the sentiment was added and that is that.


I hope you will join us for this challenge. I look forward to seeing what you all come up with! And don't forget to check out the rest of the design team!!


SUPPLIES:
Stamps: O' Tannenbaum, Keep It Simple: Christmas (Papertrey)
Paper: White, Holiday Plaid pattern paper (Papertey)
Ink: Smokey Shadow, Classic Kraft, Ripe Avocado, Pure Poppy (Papertrey), Versamark
Other: Tag Sale #5 die (Papertrey), Gold embossing powder, May Arts twine, foam dimensionals

Tuesday, December 24, 2013

Polka Dot Christmas Trees


With all the last minute details of getting ready for Christmas I almost forgot to post this card using the Pine Border Outline die. I love this die and I had fun making these whimsical polka dot trees on this card.  I used the same technique on this card as I used here. The difference is that on this card I added Glossy Accents over the top of the trees to really make them pop.


Sometimes you see things in the photo that you missed in real life.  While editing this photo I noticed that I left one tiny piece of Handsome Hunter paper in a corner of one tree. Let's pretend it's meant to be there :-)

Merry Christmas Everyone!


SUPPLIES:
Stamps: Think Big Favorites #8
Paper: Neena Solar White, Handsome Hunter, DSP (SU)
Ink: Versafine Onyx Black
Other: Pine Border Outline die (Memory Box), Glossy Accents, glue stick

Sunday, December 22, 2013

Grandson's 1st Christmas


My grandson is 10 months old so this is his first Christmas.  I pondered a long time on what to do for his card.  I wanted it to be simple and I finally came up with these mittens.


Back tomorrow for one final Christmas card!


SUPPLIES:
Stamps: Make a Mitten (SU), Think Big Favorites #8 (PTI)
Paper: Neena Solar White
Ink: Pool Party, Early Espresso (SU), Versafine Onyx Black
Other: Mitten Builder punch, white Baker's twine (SU), button, glue dots, dimensional

Wednesday, December 11, 2013

Holiday Trees


Hi! I'm back with another Christmas card.  I had some pieces left on my table from a previous card that I made and they were calling out to me.  First I die cut the trees in the white piece. Next I found a piece of Handsome Hunter that I taped behind the cutout area. Then I pieced in the outline of the trees which is in Tempting Turquoise. Pretty easy but I really like the effect. The sentiment was stamped and then the whole piece popped up on dimensionals. Couldn't have been easier!


The next card that I have to show you is on its way to my daughter in the mail and I want her to see it first so I'll be back next week to show you all too.  By then I will be moved in and hopefully unpacking my stamping supplies. Yay!

Have a great week!

SUPPLIES:
Stamps: Think Big Favorites #8 (PTI)
Paper: Neena Solar White, Handsome Hunter, Tempting Turquoise (SU)
Ink: Versafine Onyx Black
Other: Pine Border Outline die (Memory Box), glue stick

Tuesday, December 10, 2013

Season's Greetings


A couple days ago I had some time to make a few last Christmas cards.  I will share these over the next week but there probably won't be any more cards for a little while after that. We are moving on Monday so all my supplies are packed away. I feel like I'm in withdrawal :-)

I cased this card but now I can't find the card that I case'd from. Does anyone have a secret for searching Pinterest? It never seems to work for me.


I love the Eliza snowflake die by Simon Says Stamp. It is so delicate and pretty! It is popped up on a dimensional which is hidden by the enamel dot.

See you back here tomorrow :-)


Edited: I finally found the cased card HERE.


SUPPLIES:
Stamps: Two Feet Deep (PTI)
Paper: White (PTI), Crumb Cake & DSP (SU)
Other: Versamark, white embossing powder, enamel dot, Eliza snowflake die (SSS), dimensional

Friday, November 29, 2013

Silver Snowflake


Here's another card I made with the Eliza snowflake die.  I cut it out and VersaMark'd the whole flake and then embossed with silver powder. 


Happy Black Friday Everyone!


SUPPLIES:
Stamps: Holiday Cheer (PTI)
Paper: White (PTI), Basic Black (SU), silver
Ink: Versafine Onyx Black
Other: Eliza Snowflake die (SSS), Fishtail Flag Stax, (MFT), silver embossing powder, dimensionals

Thursday, November 28, 2013

Christmas Snowflake & SSS Challenge

This week's Simon Says Stamp blog Wednesday challenge is anything goes so here it is :-)


My daughter and I got in some stamping time during her visit and so I added a few more Christmas cards to my stash.  On this card I used my new Simon Says Stamp Eliza snowflake die.  It is so delicate and lacy. I love it!  I added a red button which I now see is slightly off center. Sometimes it takes a picture to notice these things.  


The snowflake is popped up on the red tag (I borrowed the tag die from my daughter-Thanks Vickie) and the tag is also popped up on the card. I used a glue dot to adhere some Bakers twine.  Thanks for stopping by today!


SUPPLIES:
Stamps: 'Tis the Season Sentiments (PTI)
Paper: White (PTI)
Ink: Versafine Onyx Black
Other: Eliza Snowflake die (SSS), Tag Sale #5 (PTI), white twine (SU), Bakers twine (King Arthur Flour), red button & dimensionals, glue dots

Tuesday, November 19, 2013

CTS #54

Hello everyone. Here's a card that I made for my Christmas stash and for this week's CAS(E) This Sketch Challenge.


I saw a video with Jennifer McGuire making some super cute cards using a Memory Box tree die.  I couldn't resist it.  My first card was just a case of her card. More on that later. For this card I die cut the trees using some red and white striped paper, pieced it all together and added the sentiment. I thought the background was too plain so I used some speckling paste with my new SSS Peppermint Stripe stencil to create a background for the trees. I kind of like how this turned out.


OK, here is the first card that I made casing Jennifer's card.  Now if you get this cute little die and decide to make Jennifer's card then here is a hint. I hadn't really used Glossy Accents before but I had fun spreading it all over my trees. I set the card aside to dry and came back a while later to check it out. Well the card was not flat and the Glossy Accents flowed down the trees and congealed into little globs. I sort of scraped off the globs and reapplied the GA and it doesn't look too bad if you don't look too closely. So after adding the Glossy Accents make sure you leave the card perfectly flat to dry. Now I know.

Thanks for stopping by and have a great Tuesday!

SUPPLIES:
Stamps: Instant Photo: Holidays (PTI)
Paper: White (PTI), Cherry Cobbler, Garden Green, Basic Black, Season of Style DSP Pack (SU)
Ink: Versafine Onyx Black
Other: Pine Border die (Memory Box), Fishtail Flag Stax, (MFT), Peppermint Stripe stencil (SSS), spackling paste, Baker's twine, dimensionals

2nd card:
Stamps: Holiday Cheer (PTI)
Paper: Handsome Hunter, Tempting Turquoise, Bermuda Bay, White & Black (SU)
Other: Wink of Stella glitter brush clear, Glossy Accents, QuickStik Craft Tool

Monday, November 18, 2013

DD #79

Hi! It's a perfectly gray, gloomy Pacific NW day today and a good day to make cards.


I just got this cute little tree border die and had some fun making cards yesterday afternoon. I really like how this card turned out using black and silver for this week's Dynamic Duos challenge.


This would have been much easier if I'd also had the pine background die that goes with the border die but SSS was out of stock. Ah well!  I first stamped the sentiment and then embossed the snow. Next I attached the black tree border using glue. I die cut the trees again out of silver paper. Before piecing in the silver pieces I pressed the embossed flakes within the tree outline down flat. My QuickStik tool was a lifesaver for picking up those tiny little pieces and putting them in place.


Well I'm only about half done with my Christmas cards. Lots more to make and I still have packing to do for our move next month. Back to it. Have a great day!

SUPPLIES:
Stamps: 'Tis The Season Sentiments (PTI)
Paper: Basic Black (SU), White (PTI), silver
Ink: Versafine Onyx Black
Other: Pine Border Outline die (Memory Box), Dots #5 EF (Sizzix), Baker's twine


Edited:  WAHOO! My card was chosen as a Dynamic Duo Runner Up!


Sunday, October 20, 2013

Season's Greetings with Two Feet Deep

This is my first card using my new PTI set Two Feet Deep.  I had major issues with the sled. The middle portion just would not stamp no matter what I did. This was the best of all my attempts.  I'll keep at it as I really like this set.


I embossed the white background with the PTI linen texture plate. The tag, the sled and the wreath are all on dimensionals.


Hope you've had a nice weekend! Thanks for stopping by!

Supplies:
Stamps: Two Feet Deep (PTI)
Paper: White (PTI), Early Espresso, Crumb Cake (SU)
Ink: Early Espresso, Real Red, Handsome Hunter (SU)
Tools: Tag Sale #3 die, Two Feet Deep dies, Linen texture plate (PTI)
Accessories: Hemp twine, dimensionals

Related Posts Plugin for WordPress, Blogger...