Sunday, December 25, 2011

Final Christmas Card of 2011

One last card to show. This card is case'd from mamamostamps with a few changes of mine.


Stamps: Dasher, Four the Holidays
Paper: Kraft, Early Espresso, Very Vanilla
Ink: Early Espresso, Cherry Cobbler
Accessories: linen thread, dimensional

Merry Christmas!


- Posted using BlogPress from my iPad

Wednesday, December 14, 2011

More Dasher & Cuttlebug Disaster

Still playing with Dasher. Today I stamped him in Early Espresso on a piece of Kraft (aka Crumb Cake) card stock and ran it through my Cuttlebug with the SU Top Note Die.  I then cut out a piece of Shimmery White with the Top Note die to go along the bottom so it's prettier than what you can see in the picture.  Cherry Cobbler seam binding is tied around and then the whole thing is up on dimensionals.


Stamps: Dasher, Season of Joy
Paper: Early Espresso, Kraft, Shimmery White
Ink: Early Espresso
Accessories: Top Note Die, Cherry Cobbler seam binding, dimensionals

Here's a variation using Frostwood Lodge DSP instead of the Shimmery White on the bottom part of the Top Note die.


Now for the disaster. I played with a new letterpress plate that I bought on sale from SU in November.  Since I have a Cuttlebug I had to figure out the sandwich for myself as I couldn't find anything on the internet.   I think that I have finally figured out the following starting from the bottom: A plate, paper (watercolor seems to work best), letterpress plate face down, a couple pieces of card stock shim & then a B plate.  I didn't figure this all out though until after trying an A plate......C plate which squashed the first part of the letterpress plate.  I stopped right away but not in time. The plate no longer will press the beginning part of the design. OOPS!  At least I bought the plate on sale :-(


Here's another Dasher that is pretty much a case of this card. I just really liked the card so had to make my own.


Stamps: Dasher, All Holidays
Paper: Kraft, Cherry Cobbler, Very Vanilla
Ink: Early Espresso, Cherry Cobbler
Accessories: Baker's twine, jingle bell, dimensionals

Tuesday, December 13, 2011

Dasher

I've been getting my Christmas cards done in dribbles and here is another one using Dasher. I love this stamp! He is so much fun to play with! For this card I stamped Dasher in Garden Green on white and added some rhinestones to his antlers for bling.  This is layered on Garden Green and then black and then popped up on dimensionals on Merry Moments DSP (SU retired paper).  Some black grosgrain ribbon and a sentiment from Warmest Regards (also SU retired) finishes it off. Pretty easy!


Card dimensions: 4-1/4 x 5-1/2"
Merry Moments DSP layer: 4 x 4-1/4"
Black layer: 2-3/4 x 3-1/2"
Garden Green layer: 2-3/8 x 3-1/8"
White Dasher layer: 2-1/4 x 3"

Stamps: Dasher, Warmest Regards
Paper: Garden Green, Basic Black, Whisper White, Merry Moments DSP (ret)
Ink: Garden Green, Basic Black
Accessories: 1/4" black grosgrain ribbon, rhinestones, dimensionals


Thursday, December 8, 2011

Color Throwdown #171

I saw the Color Throwdown this week and really liked the colors (Bravo Burgundy, Creamy Caramel, Soft Suede & Old Olive) so decided to play.  I wanted to use Mary Fish's technique of coloring the silver glimmer paper so I punched the ornament and colored it with Old Olive ink.  I did it twice but I still don't think that you can see it very well.  I like these colors but feel that the card is just sort of drab, especially for a Christmas card.  I may have to try this again.


The base of the card is Bravo Burgundy. The layers are Soft Suede, Creamy Caramel and finally Soft Suede again which I ran through a Cuttlebug embossing folder.  The decoration on the ornament is stamped on vanilla cardstock with B.B. craft ink and embossed with clear powder then popped up on a dimensional.  The ornament is also on a dimensional on a layer of vanilla and Creamy Caramel.  A piece of Old Olive grosgrain ribbon is the final touch.

Stamps: Delightful Decorations
Paper: Bravo Burgundy, Creamy Caramel, Soft Suede, Old Olive, Very Vanilla, Silver Glimmer paper
Ink: Old Olive, Bravo Burgundy (craft)
Accessories: Embossing folder,  Old Olive 5/8" grosgrain ribbon, gold cord (SU ret.), 3/4" circle punch, rhinestone, dimensionals, red sticky tape, clear embossing powder

Tuesday, December 6, 2011

Christmas Ornament Cards

Time to get down to making Christmas cards.  I got some new SU toys yesterday including the ornament punch and Delightful Decorations stamp set to match so had to play today. I am also playing along with the Pals Paper Arts challenge this week which is "puttin' on the ritz" (PPA123) or in other words to dress up your card with a little sparkle.

The first card has a Night of Navy card base.  I embossed the Cherry Cobbler layer with a Cuttlebug EF (some snowflakes) and layered it on white.  I stamped the ornament in Cherry Cobbler and punched it out then tied some Baker's Twine around it and added a rhinestone for some bling.  I popped the ornament on dimensionals on another new item that I got - silver glitter paper.  It is so pretty and shiny and I thought would look great behind the ornament .  This is also on dimensionals over some silver cord that SU retired several years ago.

Stamps: Delightful Decorations
Paper: Night of Navy, Cherry Cobbler, White, Silver Glimmer Paper
Ink: Cherry Cobbler
Accessories: Cuttlebug EF, ornament punch, silver cord (SU ret), Baker's twine, rhinestone, dimensionals, red sticky tape


For the second card I punched the ornament right out of the silver glimmer paper and tied the silver cord around it. I stamped the ornament decoration in Versamark and embossed it in white embossing powder, added a rhinestone and popped it up on a dimensional.  The ornament is also on dimensionals on the Cherry Cobbler square behind it.  This time I embossed with a fancier folder (Cuttlebug but I don't remember the name) to make it a bit more elegant.  This is layered on white and then the C.C. card base.   Hope you like these Christmas cards.  There will be more to come in the next few days :-)

Stamps: Delightful Decorations
Paper: Cherry Cobbler, white, Silver Glimmer Paper
Ink: Versamark
Accessories: Ornament punch, 3/4" circle punch, silver cord (SU ret), embossing folder, white embossing powder, rhinestone, dimensionals, red sticky tape


Card dimensions for both cards:
Base: 4-1/4 x 5-1/2"
White layer: 3-5/8 x 4-7/8"
Cherry layer: 3-1/2 x 4-3/4"
White square: 2-1/8 x 2-1/8"
Cherry Square: 2 x 2"

Sunday, November 27, 2011

I Dig Your Birthday

This card is for my dad's 82nd birthday.  I know this is a kid's set but he has a sense of humor.

The base of the card is Cherry Cobbler, then Garden Green and finally some of the wonderful Frostwood Lodge DSP.  The little bulldozer is stamped in black on white and then layered on black. I used markers to color the presents in Cherry Cobbler and Garden Green.  The image is popped up on dimensionals over Cherry Cobbler seam binding.


Stamps: I Dig You
Paper: Cherry Cobbler, Garden Green, Black, White, Frostwood Lodge DSP
Ink: Black
Accessories: Markers: Cherry Cobbler, Garden Green & Black, Cherry Cobbler seam binding, dimensionals

Thursday, November 10, 2011

Birthday Star

This card is a case of Tui Nathan at Stampin Time. I made this for my daughter's birthday so I had to delay posting but the happy day is now past so here it is.  I love the color combo of pool party, riding hood red and kraft (aka crumb cake).  Here's all the details:

Pool Party print DSP: 3-1/2 x 4-1/2”

Black strip: 3-1/2 x 1-1/2”
Kraft strip: 3-1/2 x 1-3/8”

Riding Hood Red strip:  4-1/2 x 1” (when crimped it will be about 4-1/4")  Use your paper snips to cut the ends. It is attached to the kraft strip with red sticky strip.

Star:  I used an embossing tool on my score pal from each point all the way across the star to the opposite side. Then I pinched up the long sides and folded in the short sides. I hope that makes sense. There are 3 SU dimensionals under the star to hold it place on the scalloped circle.

White scallop circle: Attached with a dimensional near the top and bottom to lift over the crimped red strip.


Stamps:  Family Phrases
Paper: Kraft, black, Riding Hood Red, Pool Party Print DSP, White
Ink: Black
Accessories: Nestabilities scalloped circle, SU star, crimper, dimensionals, Score-Pal

Sunday, October 23, 2011

Clean & Simple Trendy Trees

I love CAS cards and I think this one falls into that category. I case'd the layout from a cute card by Julie Davison.


The 3 panels were about 3-5/8 x 1-1/2".  I used the corner rounder on the two outer panels. I should have gotten out my stamp-a-majig for the tree but I just freehanded it. It took me 3 tries to get it right :-)  The sentiment is stamped in Always Artichoke and then I used the corner rounder on opposite corners and finally I added a bit of twine and that's it.

It's always fun to decorate the inside too so I added a strip of the DSP and used the scallop border punch to pretty it up.


Stamps: Trendy Trees
Paper: Kraft, White, Springtime Vintage DSP (ret)
Ink: Always Artichoke, Crumb Cake
Accessories: corner rounder punch, twine

Saturday, October 22, 2011

One Last Halloween Bingo Bits Card

One final Halloween card using the ever so cute Halloween Bingo Bits. I just love these little guys!  Each image is cut with a 1-1/4" circle punch then layered on a 1-3/8" circle. Each circle is popped up with a dimensional.  The black layer is paper pierced all around the edge but I don't think that you can see that in the picture. This is layered on Eggplant Envy and that layer is also on dimensionals. The pumpkin layer is embossed with the spider web embossing folder.  A strip of black punched with the scallop border punch and a thin strip of Eggplant  with 2 brads finish off the pumpkin layer.


Here's a side view but it's still really hard to see the layering.


Stamps: Spooky Bingo Bits, Teeny Tiny Wishes
Paper: Kraft, Pumpkin Pie, Eggplant Envy, Black, White
Ink: Pumpkin Pie, Eggplant Envy, Old Olive, Black
Accessories: spider web EF, 1-1/4" & 1-3/8" circle punches, scallop border punch, black brads, paper piercer and mat pack, word window punch, modern label punch

Friday, October 21, 2011

Another Spooky Bingo Bits

This is a CASE of a cute card I found at My Creative Corner.  I changed it slightly by using the spider web embossing folder on the black lower portion. I used a black marker to draw the spider's web.


See the inside of the card below.  It's a simple "BOO!" from the Spooky Bingo Bits set.  Sorry it's blurry but I took it with my iPhone and I was in a hurry.


Stamps: Spooky Bingo Bits, Teeny Tiny Wishes
Paper: Whisper White, Basic Black
Ink: Black
Accessories: spider web embossing folder, 1-1/4" circle punch, black marker
Techniques: embossing


Tuesday, October 11, 2011

Spooky Bingo Halloween Card

I'm so excited that I got the Spooky Bingo Bits set today. I've been eyeing this set since the catalog came out and I finally got it. I just had to make a card right away.

My only Halloween paper is the retired Halloween Fright which I used with the Top Note die.  I cut around the perforated edge and then used the Top Note die to make the Pumpkin Pie background. This is layered on the card with dimensionals.  The DSP matches Vintage Violet (also retired) which I used for the card base and embossed with the spider web embossing folder.  I stamped the cute little Halloween images in Vintage Violet on white & cut them out with the 1-1/4" circle punch. They are backed with 1-3/8" Pumpkin Pie circles and then popped up on dimensionals.  The "Boo" is from the Tiny Tags set and punched with the Jewelry Tag punch.  I used non-SU Bakers twine  to tie the tag on. Watch for more cards using these fun bingo bits :-)


Stamps: Spooky Bingo Bits, Tiny Tags
Paper: Vintage Violet (ret), Pumpkin Pie, Whisper White, Halloween Fright DSP (ret)
Ink: Vintage Violet, Pumpkin Pie
Accessories: 1-1/4" & 1-3/8" circle punches, jewelry tag punch, Baker's twine, spider embossing folder, dimensionals

Thursday, October 6, 2011

Perfectly Penned Birthday

This card is for my SIL's bday next week.  I got inspiration from this card by Stampercamper whose work I love.  I'm a bit grumpy about it though. I thought the black ink on the Happy Birthday was dry but apparently not because as you can see it is smeared. Grr!  Well aside from that I like how the card turned out :-)

I stamped the doily in Crumb Cake and then stamped the flowers in black.  The flower heads use both of the stamps in the set. The first stamp was full strength black and for the 2nd stamp I stamped off twice to get it lighter.  You can't really tell in the picture but there are dimensionals between the Kraft (yes I still have a supply of Kraft cardstock) layer and the black card base. It gives it a bit of depth in real life.

Stamps: Hello Doily, Perfectly Penned
Paper: Black, Kraft (aka Crumb Cake), White
Ink: Black, Crumb Cake
Accessories: Mat pack & paper piercer, 1/4" black grosgrain ribbon, dimensionals


Edited: Chosen as an SCS Weekly Favorite: (post #9)


Monday, October 3, 2011

Cute Little Gingerbread Men

These Post It pads use the set that got me into stamping many years ago.  It's called Seasonal Patches.  I went to a Christmas card stamping event at my church and one of the cards used this stamp.  I fell in love. I didn't know what company made the stamp but about a week later I was riding the bus to work and the lady sitting next to me had a Stampin'Up catalog.  I asked if I could look at it and there was my little stamp.  I placed an order with her and I've been stamping ever since :-)


The base layer of Soft Suede is 6-11/16 x 3-1/8". I scored from each end at 3-1/8".  The gingerbread man is popped up on dimensionals.  I'm really loving the Spice Cake DSP and I hope you like my gingerbread men too!

Stamps: Seasonal Patches
Paper: Soft Suede, Pool Party, More Mustard, Very Vanilla, Spice Cake DSP
Ink: Soft Suede, Cajun Craze (marker)
Accessories: antique brads, dimensionals


Saturday, October 1, 2011

Day of Gratitude Post Its

Still working on Post It pads. This time I have a fall theme.  All 3 pads are slightly different so look closely :-)


 The one on the left has a cute little vintage pin attaching the tags to the Pear Pizzazz ribbon.

The top tag is Very Vanilla stamped with images from the Tiny Tags stamp set. The middle tag is punched from More Mustard & also stamped with a Tiny Tag image. The bottom tag is punched from Spice Cake DSP.

The one on the right uses linen thread to tie the tags to the Victoria lace ribbon.

Stamps: Day of Gratitude, Tiny Tags
Paper: Soft Suede, More Mustard, Very Vanilla, Spice Cake DSP
Ink: Pear Pizzazz, Soft Suede, More Mustard (markers)
Accessories: Pear Pizzazz ribbon, Victoria lace ribbon, Jewelry Tag punch, 1-3/4" circle punch, scallop punch, linen thread, vintage trinket safety pin, dimensionals, sticky tape


Wednesday, September 28, 2011

Stitched Stockings Post It Pads

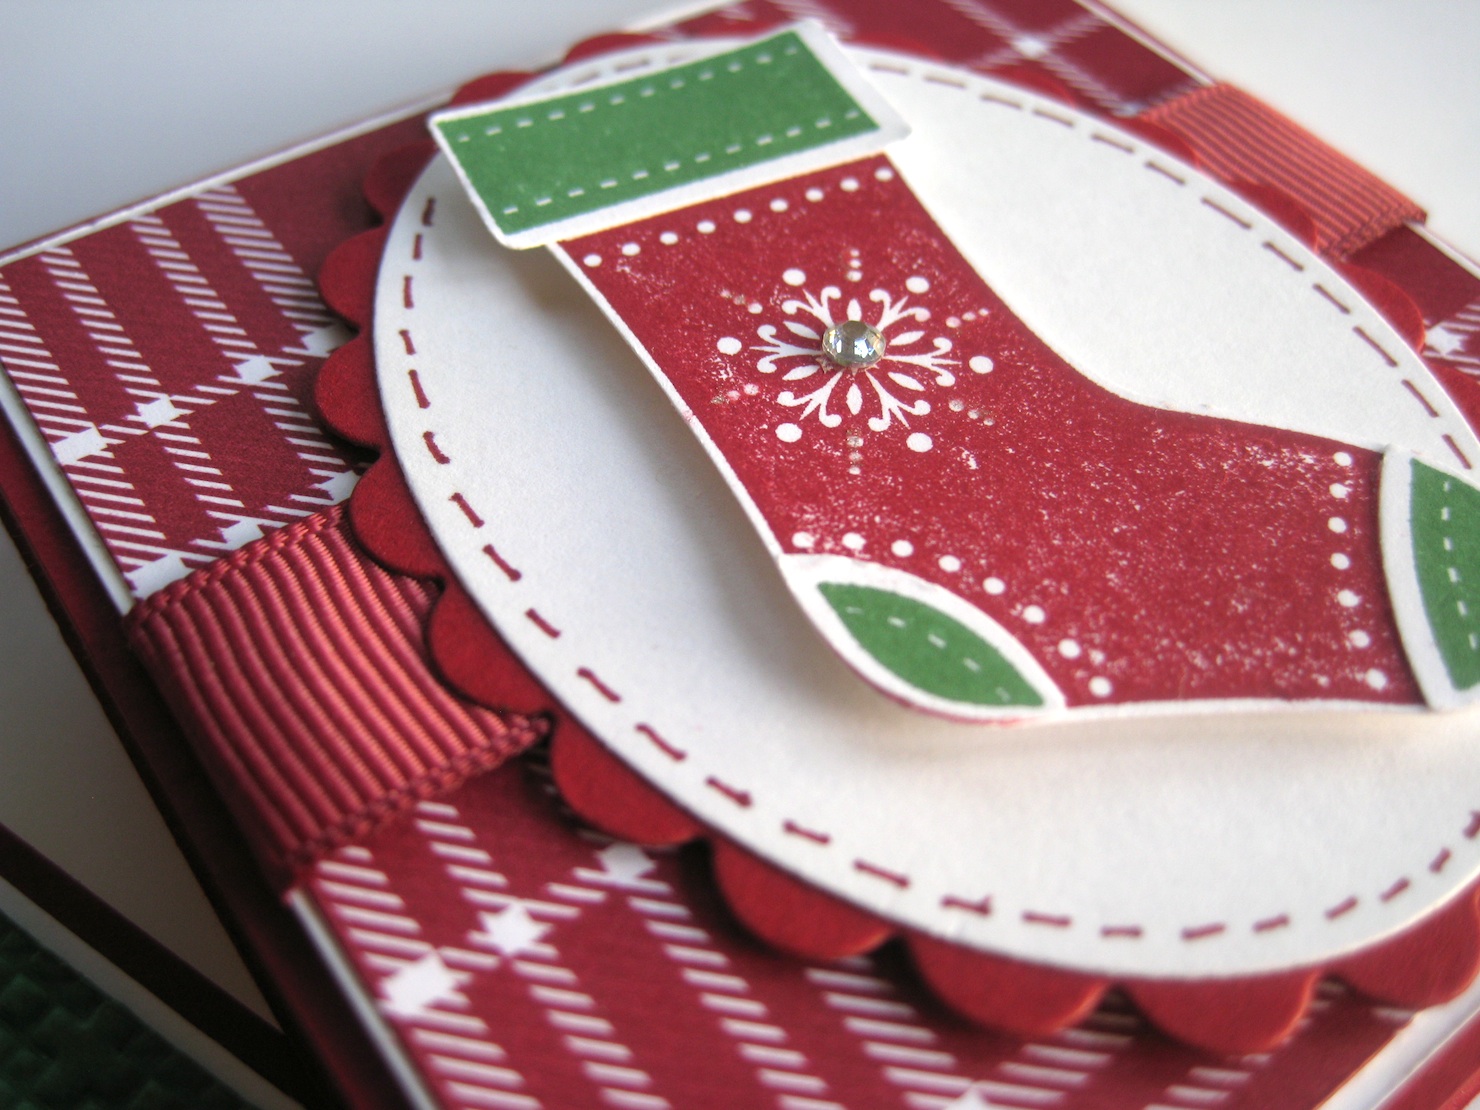
Yesterday I made a couple more Post It pads this time using the new Stitched Stockings stamp set.  These little stockings are so cute and come in several styles to choose from.

On the left the two stockings are nudged up on top of the ribbon and mounted with dimensionals to give them the look of hanging from the ribbon.  On the right, the stocking is on a dimensional on top of the ovals and then the oval is also on dimensionals.  The dimensionals give just a little bit of added depth that gives that extra punch to the design.  I also added rhinestones which are REALLY hard to photograph but I hope that you can see slightly glimmering in the pics :-)

I didn't want to use the cherry seam binding again and I was having trouble finding ribbon to match the stocking on the right but I found some Baroque Burgundy which I think is a close enough match to the DSP.

Also I have to confess that I keep cheap, white non-SU cardstock that I use for layering etc but I must have grabbed it accidentally (sometimes the scrap piles get mixed up) and stamped the stockings. They are not as crisp as the the reindeer in my previous post. It really does make a difference what cardstock you use!

Thanks for stopping by and happy crafting!


Edited 9/18/2020

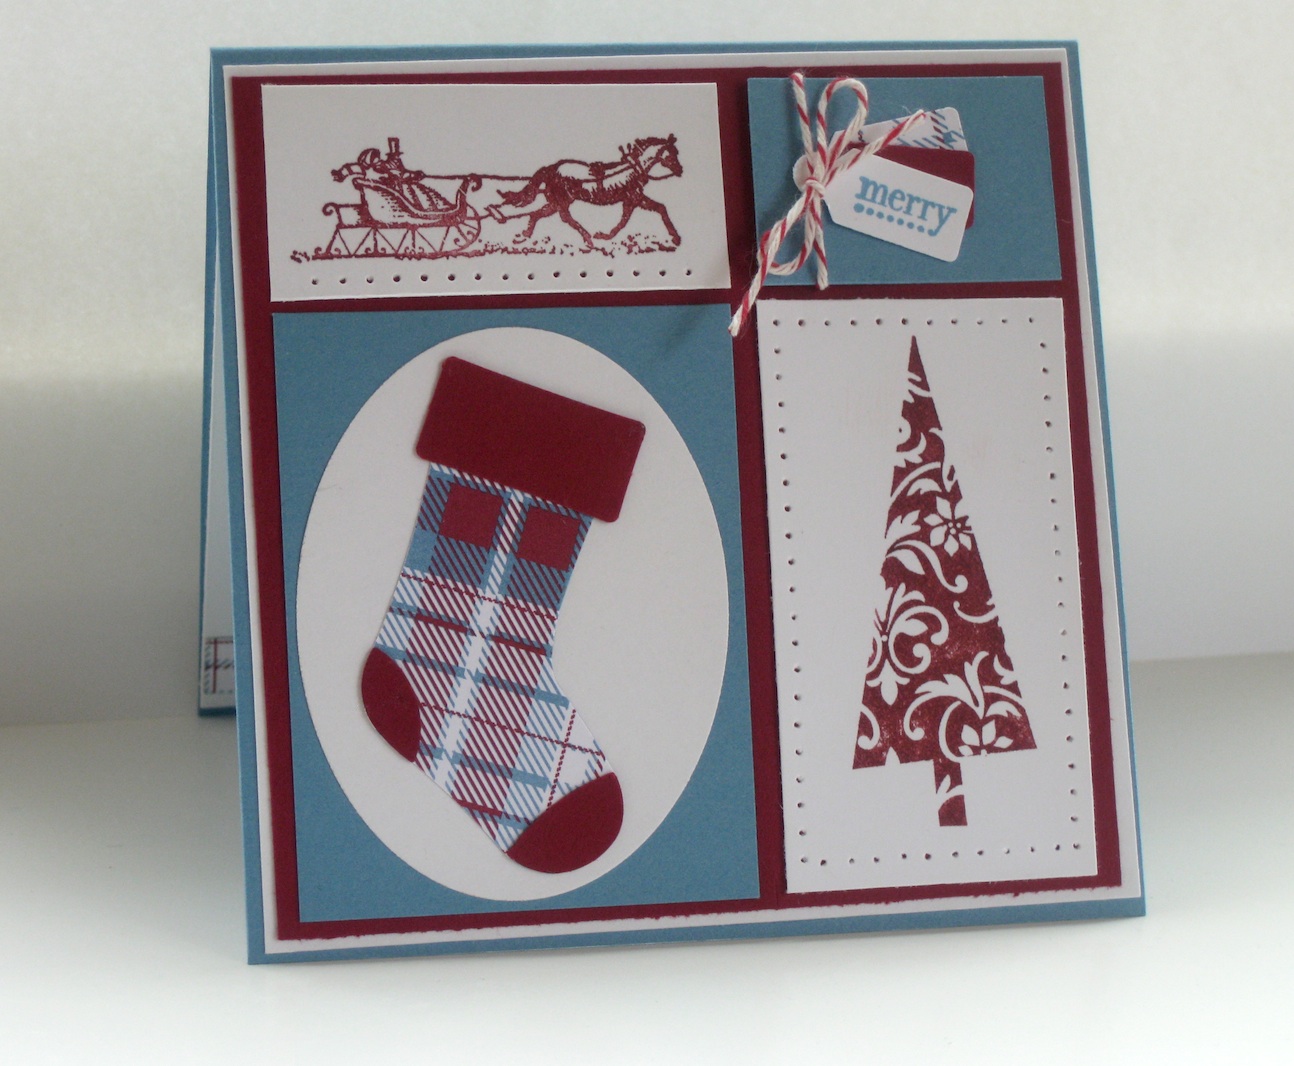
I just got a request for the dimensions of these little post it pads. I have always loved these cuties! They are quick, easy to make and are great for tuck in gifts! So here are the dimensions:

• The base layer is 6-11/16" x 3-1/8"
• Score at 3-1/8" from each short end and fold on score lines
• Adhere a 3" x 3" post pad inside

Decorate the outside as you like. For these, here is what I did:

• White Layer: 2-7/8 x 2-7/8”

• DSP layer: 2-3/4 x 2-3/4”


I have made a lot of these and will try to post more pictures today. Thanks for taking a look at one of my past projects!

Stamps: Stitched Stockings
Paper: Cherry Cobbler, Whisper White, Frostwood Lodge DSP
Ink: Cherry Cobbler (pad & marker), Garden Green
Accessories: Stitched Stockings punch, circle and scalloped circle punches, cherry cobbler seam binding, baroque burgundy 5/8" grosgrain ribbon (ret), square lattice EF, dimensionals, sticky tape, rhinestones, glue stick


Tuesday, September 27, 2011

Christmas Post It Pads

Today's craft fair project is Post It pads.  I had to use more of the Frostwood Lodge DSP because I just LOVE it and I thought the reindeer from the Winter Post stamp set would be a nice complement to it.


The base of Cherry Cobbler paper is 6-11/16 x 3-1/8".  I scored at 3-1/8" from each end.

Stamps: Winter Post
Paper: Cherry Cobbler, Marina Mist, Frostwood Lodge
Ink: Cherry Cobbler
Accessories: Cherry Cobbler seam binding, circle and scallop circle punches, sticky tape, dimensionals

Monday, September 26, 2011

Christmas MOJO208

Yeah, I finally get to play in my stamp room. I've been making soap for our church craft fair for a couple weeks but that's done now.  I checked out MOJO Monday 208 and I thought that I could come up with something. It took me a while to get into the swing but I like the results.


I love the new Frostwood Lodge DP in the Holiday Mini and the Stitched Stockings punch is so fun too!  The card is 4-1/4" square and I think everything else is pretty straight forward.

I don't usually decorate the inside but my daughter has inspired me to do it.  You can see her lovely cards here.

Thanks for stopping by!


Stamps: patterned pines, tiny tags, yuletide Christmas
Paper: Marina Mist, Cherry Cobbler, Whisper White, Frostwood Lodge DSP
Ink: Marina Mist, Cherry Cobbler
Accessories: Stictched Stockings punch, Jewelry Tag punch, Bakers twine, mat pack & paper piercer, oval punch

Monday, September 12, 2011

Spice Cake Post It Pad Holder

Well it's time to really push to make items for my church's upcoming craft fair in November. I'm kinda behind due to family stuff but that's ok.  Here's a post-it note holder made with the delicious Spice Cake DSP in the Holiday Mini catalog.


The outside dimensions are 6-11/16 x 3-1/8". I scored at 3-1/8" from each short end.


Here's a side view to see the layers better.  There are dimensionals between the Spice Cake and flower layer. Also between the flower and the center of the flower. There will be more post-it pads coming soon :-)

Stamps: Posy Punch (hostess)
Paper: Peach Parfait, Soft Suede, Very Vanilla, Spice Cake DSP
Ink: Pool Party, Peach Parfait
Accessories: Victoria lace ribbon, antique brad, dimensionals, 3/4" circle punch

Friday, September 9, 2011

Pennant Parade Hello

I haven't stamped in about a month because I've been taking care of my parents after my dad's hip surgery.  Mom & Dad are both back home now and I had a few minutes to make a card.  The pennant punch was on my table and some pieces of retired SU designer paper so I grabbed my Pennant Parade stamp set and was off and running.  Here is what I came up with.


It's a simple card and there is a small bloop above one of the hellos.  Don't you just hate when that happens! Oh well.  I used the stamp-a-majig to line up all the hellos but I find it difficult to use it with the acrylic blocks and clear stamps.  I just don't get them lined up as well as with the wood blocks.  I cheated a tiny bit and used non SU yellow/white Bakers twine but that's easy to change out.  The card is also an odd size ( 3-1/2 x 6-1/4") because I wanted it to fit into a standard size envelope.

 I can't wait to play some more with new stuff that has been sitting in a box for a month!!


Stamps: Pennant Parade
Paper: Lucky Limeade, Whisper White, retired SU designer paper (don't remember name)
Ink: Daffodil Delight, Island Indigo, Calypso Coral, Lucky Limeade
Accessories: In Color brads, Petite Pennants Builder punch, Bakers twine, markers in Daffodil Delight, Island Indigo, Calypso Coral, Lucky Limeade

Thursday, August 4, 2011

Another Springtime Vintage Card

The Springtime Vintage DSP has many looks to it. This side of the paper matches Rose Red & Pear Pizzazz. I really like this as well.  For the button I punched out Rose Red paper with the Itty Bitty Punch Pack flower punch.


Stamps: Warmest Regards
Paper: Kraft, Very Vanilla, Rose Red, Springtime Vintage DSP
Ink: Always Artichoke
Accessories: Rose Red seam binding, Itty Bitty button, Itty Bitty Punch Pack, non-SU Baker's twine

Wednesday, August 3, 2011

So Happy For You

I got some time in my stamp room this afternoon.  I have the Springtime Vintage DSP and have barely touched it. It is so pretty and I thought I better put it to use. Here is what I came up with.


I cut a piece of Very Vanilla 3 x 4-1/2". Then I cut 2 strips of DSP 1 x 4-1/2" and layered them on the Vanilla piece. This left a place on the vanilla for the sentiment and a button. Finally I tied a piece of Crumb Cake seam binding around this and attached it to a base of Kraft (aka Crumb Cake). The button has a piece of linen thread through it. I think I might have to make a couple more of these using different colors from the Springtime Vintage paper :-)

Stamps: So Happy For You (SAB ret.)
Paper: Kraft, Very Vanilla, Springtime Vintage DSP (ret)
Ink: Not Quite Navy
Accessories: Crumb Cake seam binding, Subtles button, linen thread

Monday, August 1, 2011

Slice of Life

Here is the last card that I made while stamping with my girls.  I used markers on the sentiment. The ribbon was threaded through the button and taped to the back.  The right corner seemed to need something so my daughter suggested the flower brads. It's the perfect final touch.


Stamps: A Slice of LIfe, Warmest Regards
Paper: Early Espresso, Pretty in Pink, Whisper White, Nursery Necessities (ret)
Ink: Tempting Turquoise, Daffodil Delight, Melon Mambo, Pretty in Pink
Accessories: Button Bouquet button (ret), Pink Gingham ribbon (ret), scallop border punch, flower brads (only non-SU)

Sunday, July 31, 2011

Eggplant Because I Care

I got a new set of scallop Nestabilities ( I forget the exact name right now) and I had to play with them.   Here I have a white base layered with white embossed with the square lattice EF.  I inked up the flower with Wisteria Wonder and then used a sponge dauber to add some Elegant Eggplant highlights. I used a Lucky Limeade marker on the leaves. The eggplant strip is from the Rich Regals Print DSP.

This card is nearly entirely SUO. If you sub a regular scallop punch for the fancy Nestability it would be SUO.

My daughters have been here visiting and we've spent some time stamping. It's been lots of fun! More cards tomorrow :-)


Stamps: Just Because
Paper: Elegant Eggplant, Whisper White, Elegant Eggplant Print DSP
Ink: Wisteria Wonder, Elegant Eggplant, Lucky Limeade
Accessories: Square lattice EF, Nestabilities, dimensionals, sponge dauber


Masculine Card

I wanted a masculine card so no ribbon or frills. Instead I used my Score-Pal to score double lines above and below the image.


Stamps: Birds and Nests by Cavallini
Paper: Early Espresso Neutral Print DSP, Whisper White
Ink: Early Espresso
Accessories: Postage Stamp punch, Score-Pal

Just Believe

Here is a slightly modified version of a cute card I found here.  Markers were used on the main image.  The sentiment is popped up on dimensionals.


Stamps:  Just Believe
Paper: Kraft, Cherry Cobbler, Whisper White
Ink: Cherry Cobbler & Wild Wasabi markers
Accessories: Scalloped Border punch, twine, dimensionals

Thursday, July 28, 2011

Happy 80th Bday Mom

I love how bright and happy the melon mambo and pumpkin pie look together.  This card is pretty straight forward. I used the stamp-a-majig to get the frosting on the cake but I didn't use it for the candle hence the floating in the sky candle :-)  I used markers for the candle and the little dots on the frosting. The heart on the circle is popped up on a dimensional as is the cupcake layer and the tag layer. The buttons are attached with glue dots. Thanks for checking out my card.


Stamps: Create A Cupcake, Happiest Birthday Wishes
Paper: Pumpkin Pie, Melon Mambo, Whisper White, Flirtatious DSP
Ink: Pumpkin Pie, Melon Mambo, Pretty in Pink
Accessories: Pumpkin Pie, Melon Mambo & Daffodil Delight markers, 3/4" circle punch, heart to heart punch, large & small tag punches, melon mambo ribbon, soft subtles button, Baker's twine (non-SU), dimensionals

Wednesday, July 27, 2011

Get Well & Hello Doily

New stamp and new color! Fun stuff!  Here is the new SU Hello, Doily stamp done in Wisteria Wonder.


I stamped the doily in the new 2011 In Color Wisteria Wonder. I added some retired Vintage Violet ribbon and then matted it on Wisteria Wonder and then Whisper White.  I punched some Wisteria using the decorative label punch but it seemed too big for the white oval so I cut out the mid section, taped it together on the back side and then added the oval. You have to look really close to see it. It fits much better now.

This card also works nicely for the SU Only Challenge SUOC24.

Stamps: Hello Doily, Teeny Tiny Wishes
Paper: Wisteria Wonder, Whisper White
Ink: Wisteria Wonder
Accessories: Vintage Violet ribbon (ret), large oval punch, decorative label punch, dimensionals


Addendum:  I needed a sympathy card so I went back and reworked this slightly.  Only minor changes. This time I didn't cut down the decorative label punch and I moved it up.


Thursday, June 30, 2011

4th of July

Well I'm behind on my 4th of July cards. It has been so cold here in the NW that it hardly seems like it could nearly be the 4th....but the calendar marches on.

I got this set called July Fourth when it retired last year so this is my first chance to ink it up.  The base card is Riding Hood Red which I emobossed with the dots folder.  The blue panels are retired Night of Navy print pattern paper with a white layer underneath. The stars are stamped in Riding Hood Red and punched out with the star punch which is retiring. Today is the last day to purchase that punch from SU.  I popped up the stars on dimensionals. The sentiment, from the hostess set Afterthoughts, is also stamped in RHR.  The star bursts are stamped in Night of Navy and then I put on highlights with a Starburst Gelly Roll pen to give them a twinkle.  Well I better get this card in the mail :-)  Happy 4th everyone!


Closeup of the highlights on the starbursts.

The inside of the card.
Supplies Used


Stamps: July Fourth, Afterthoughts
Paper: Riding Hood Red, Night of Navy, NON Prints DP (ret)
Ink: Riding Hood Red, Night of Navy
Accessories: Star punch, Dots EF, dimensionals, Starburst gelly roll pen

Thursday, June 16, 2011

In Color Teacups

This card is cased from the cover of the July Stampin Success magazine. I love the little bird they used which is from a new set coming out in July.  I can't wait to order him :-)


I used my stamp-a-majig to line up the teacups on the white panel. They are stamped in this year's new In Colors. The hello stamped in Elegant Eggplant which matches the Wisteria beautifully and was then punched out with the Word Window punch and a second piece of Wisteria was layered underneath to give it a bit more dimension.  The flower button is also Eggplant.  The sentiment was then popped up on a dimensional.

I love the new In Colors but does anyone else think they are really similar to Cameo Coral, Kiwi Kiss, Soft Sky, Blue Bayou and a light Vintage Violet?  I'll have to do a stamp comparison and then post my results. Thanks for stopping by.


Stamps: Tiny Teacup
Paper: Kraft, Calypso Coral, Lucky Limeade, Pool Party, Island Indigo, Wisteria Wonder, Whisper White
Ink: Calypso Coral, Lucky Limeade, Pool Party, Island Indigo, Wisteria Wonder, Elegant Eggplant
Accessories: Word Window punch, Rich Regal button, 1/8" white taffeta ribbon, scallop border punch, stamp-a-majig, dimensionals

I almost forgot to mention that this card is also for FTL144.  I just reversed the layout.


Saturday, June 11, 2011

It's an Event Full Graduation

My cousin's son is graduating so I needed a grad card. I thought for a boy simple would be the best way to go and this is about as simple as you can get.  Event Full is an old hostess set but it's still kinda fun to play with.  The middle panel is popped up on dimensionals.


Stamps: Event Full
Paper: Basic Black, Whisper White
Ink: Basic Black
Accessories: Lattice EF, Black grosgrain ribbon, dimensionals


p.s. My daughter case'd my card (isn't that sweet) but reversed the colors. Her card is white on black and I really like the look of it. Check it out.

Stampin'Up Headquarters

I got to visit the Stampin'Up headquarters when I was in Utah in May.  It's absolutely gorgeous.


Related Posts Plugin for WordPress, Blogger...